Showing posts with label baby shower. Show all posts

Tuesday, July 13, 2010

Building a Nest: The End

Thank you for sticking with me for all the baby shower posts! One of the projects I was most proud about was the sugar cookie favors. I spaced this project out over the week prior to the shower. I found a few ribbons at AC Moore that had all the colors that I was planning on using.

Sunday evening, I baked the sugar cookies. Monday through Wednesday I decorated them and Thursday I bagged and tied them. I think they came out pretty good-- I added 1/2 tsp corn syrup to my royal icing-- based on the bakeat350.blogspot.com recommendations. It added a bit of gloss to my icing. I'm not a huge fan of corn syrup but I am not sure what else to use to get a bit more shine in the frosting. One batch of frosting was a little shy of frosting 2 batches of sugar cookies... but I made it last though!
Each package got one square cookie and one of the three bird cookies (orange, blue & green).

DSC03946


Here they are, packaged & ready to go!
DSC03951

And that's a wrap!

Friday, July 9, 2010

Building a Nest: Samoa Cookie Flavored Bird Nest Cupcakes

I found the idea for these cupcakes on Martha Stewart's site and they worked perfectly for the theme I was going for for the shower. The hardest part came wtih deciding the cupcake/ frosting combination... i needed to pair with coconut and fit in with bird nest concept-- I searched high and low, and had several ideas... but I wasn't set on any of them. At lunch, the last day of work before the shower, one of my coworkers suggested samoa cookie as a flavor idea... and I literally hopped up and ran to google it. I came across this recipe and it just seemed perfect.

It turned out great! The only problem I had was halving the recipe-- it believe I added the whole amount of cocoa for half the recipe-- but it was pretty good! I'd have to make it again to double check that. The frosting is A.M.A.Z.I.N.G.... it was pretty easy to make and tasted perfect. I'm very happy with how these came out... minus the birds. I think they could have been better... plus I forgot to add their eyes! Ooops!


Samoa Bird Nest Cupcakes
adapted from Life in a Peanut Shell (adapted from Ghirardelli Grand Fudge Cake)

Made 24 regular sized cupcakes (I made half the recipe)

Ingredients:
3/4 cup Unsweetened Cocoa (I tried Ghirardelli cocoa for this recipe)
2 cups all-purpose flour
1 3/4 cups sugar
1 teaspoon baking powder
1 teaspoon baking soda
1/2 teaspoon salt
1 cup butter, softened
1 1/3 cups milk
2 large eggs
2 teaspoons vanilla


Preheat oven to 350ºF. Line 2 regular muffin tins with liners.

In a medium bowl, combine flour, cocoa, baking powder, baking soda, and salt, and set aside.

In a large bowl, cream butter and sugar on medium-high speed until light and fluffy, about 4 minutes. Reduce speed to low, and add vanilla and eggs one at a time, scraping bowl after each addition. Alternately add flour mixture and milk (starting and ending with the flour mixture), while mixing on low speed. Continue to mix until smooth. Scoop into muffin tins.

Bake for about 15-18 minutes.


Caramel Buttercream

2 1/2 cups light brown sugar
1/2 cup butter
1 cup heavy whipping cream, (put 2-3 tbsp aside)
1/2 tsp baking soda
3-4 cups powdered sugar, sifted

In a medium, heavy saucepan, bring the sugar and cream to a rolling boil. Boil one minute.

Add soda, and boil one more minute. Remove from heat.

Add butter, but do not stir yet. Let the mixture cool in the fridge for 1-2 hours. Do not stir until mixture is completely cooled.
Pour mixture into a stand mixer and, using the paddle attachment, beat well. Gradually add powdered sugar alternately with 2-3 tbsp of heavy cream. Beat until desire consistency.


To Decorate:

Toast sweetened coconut until golden in color. Let cool.

Using a 1M tip, frost the cupcakes. Then sprinkle coconut on top of the frosting (most around the perimeter). I used buttercream for the birds-- divide into 2 bowls and color blue & yellow (or whatever color you want). Using a round tip, pipe 3 mounds of blue icing in the middle of the cupcakes. Then use a leaf tip and pipe the beak. Melt some chocolate and use a toothpick and dot the eyes on each bird (use your imagination here).


DSC04002DSC03984

Wednesday, July 7, 2010

Building a Nest: Mushroom Polenta Canapes

A few years ago, I was at a wedding and had a polenta canape during cocktail hour.... and every since I've dreamed of having them again. I had never made polenta before and had only had it a few times. I started envisioning different dishes with polenta in it. For my best friend's shower, I knew I wanted a polenta recipe and searched high and low for the perfect recipe. Somewhere along the recipe search, I decided to pair mushrooms with the polenta and finally came across a Cooking Light recipe.

I thought this recipe came out pretty well- I'd like to make it again when I don't have a lot going on so I can give it a bit more attention (I believe I added cheese to both top and bottom of the polenta pieces... oops!). I thought it had great taste and looked pretty.

My one tip about cooking polenta is to watch out, it spits when you add it to the boiling liquid. Don't stand directly over the pot when it's cooking... or you'll get attacked!


Mushroom Polenta Canapes
adapted from Cooking Light

Polenta:

4 1/2 cups chicken broth
1 1/2 cups quick-cooking polenta
1 teaspoon salt
Cooking spray
1 tablespoon butter, melted
1/2 cup (2 ounces) shredded Gruyère cheese

Topping:
1 cup boiling water
1/2 ounce dried porcini mushrooms
1 tablespoon butter
1/3 cup thinly sliced shallots
1/8 teaspoon crushed red pepper
1 cup sliced shiitake mushroom caps (about 3 1/2 ounces)
1 cup sliced cremini mushrooms (about 3 1/2 ounces)
1 teaspoon dry vermouth or dry white wine
splash of sherry wine
1/2 teaspoon minced fresh thyme
1/4 teaspoon salt
1/4 teaspoon freshly ground black pepper
1/4 cup (1 ounce) shaved Gruyère cheese

Preparation

1. To prepare polenta, bring 4 1/2 cups broth to a boil in a medium saucepan. Gradually add polenta and 1 teaspoon salt, stirring constantly with a whisk. Reduce heat to low; cook 3 minutes or until thick, stirring frequently. Spoon polenta into a 13 x 9–inch baking pan coated with cooking spray, spreading evenly. Press plastic wrap onto surface of polenta; chill 1 hour or until firm.

2. Preheat broiler.

3. Invert polenta onto a baking sheet coated with cooking spray. Cut polenta into 36 rectangles (leave polenta on baking sheet). Broil 5 minutes. Turn polenta over. Brush polenta with 1 tablespoon butter. Broil 5 minutes. Sprinkle 1/2 cup shredded cheese evenly over rectangles; broil 5 minutes or until cheese melts.

4. To prepare topping, combine 1 cup boiling water and porcini mushrooms in a bowl; cover and let stand for 15 minutes. Drain; chop mushrooms.

5. Melt 1 tablespoon butter in a large nonstick skillet over medium heat. Add shallots to pan; cook 4 minutes or until tender, stirring frequently. Stir in red pepper; cook 30 seconds. Add porcini, shiitake, and cremini mushrooms; cook over medium-high heat 10 minutes or until liquid evaporates, stirring occasionally. Stir in vermouth, sherry, thyme, 1/4 teaspoon salt, and black pepper; cook 2 minutes, stirring frequently.

6. Spoon 1 teaspoon mushroom mixture on top of each polenta rectangle; top rectangles evenly with shaved cheese.


DSC03995

Friday, July 2, 2010

Building a Nest: Strawberry Shortcake Cake

I am skipping to the dessert section of the baby shower-- I think I still have one or two more posts on the appetizers left-- but I wanted to post this recipe before the Fourth of July weekend. I first made this recipe last year for my in-laws 40th wedding anniversary and we all absolutely loved it. I don't believe I had ever had cream cheese frosting prior to that and now I'm hooked. This recipe is absolutely perfect-- I did add some lemon zest to the cake and never measure the powdered sugar that goes into the frosting-- I just judge by taste and texture... and so far, it's worked out pretty well!

If you have a few strawberries laying around the house, I encourage you to try this recipe. It's absolutely devine!

Strawberry Shortcake Cake
adapted from Pioneer Woman

Cake

1-½ cup Flour
3 Tablespoons Corn Starch
½ teaspoons Salt
1 teaspoon Baking Soda
9 Tablespoons Unsalted Butter, Softened
1-½ cup Sugar
3 whole Large Eggs
½ cups Sour Cream, Room Temperature
1 teaspoon Vanilla
2 tsp fresh lemon zest

Icing
½ pounds Cream Cheese, Room Temperature (I use 1/3 less fat cream cheese)
2 sticks Unsalted Butter
1-½ pound Powdered Sugar, Sifted
1 teaspoon Vanilla

1 pound Strawberries
Cake pan at least 2 inches deep-- I used 9 x 2 round pan.

Preparation Instructions

Sift together flour, salt, baking soda, and corn starch.

Cream 9 tablespoons butter with the sugar until light and fluffy. Add eggs one at a time, mixing well each time. Add sour cream and vanilla and mix until combined. Add sifted dry ingredients and mix on low speed until just barely combined.

Pour into greased and floured 9-inch cake pan. Bake at 350 degrees for 45 to 50 minutes, or until no longer jiggly. Remove from cake pan as soon as you pull it out of the oven, and place on a cooling rack and allow it to cool completely.

Stem strawberries and slice them. Place into a bowl and sprinkle with 3 tablespoons sugar. Stir together and let sit for 30 minutes. After 30 minutes, mash the strawberries in two batches. Sprinkle each half with 1 tablespoons sugar and allow to sit for another 30 minutes. The original recipe states to mash the strawberries but I skip that step- I keep them in tact.

Frosting
Combine cream cheese, 2 sticks butter, sifted powdered sugar, vanilla, and dash of salt in a mixing bowl. Mix until very light and fluffy.

Slice cake in half through the middle. Spread strawberries evenly over each half (cut side up), pouring on all the juices. Place cake halves into the freezer for five minutes- this makes icing the cakes easier.

Remove from freezer. Use a little less than 1/3 of the icing to spread over the top of the strawberries on the bottom layer. Place the second layer on top. Add half of the remaining icing to the top spreading evenly, then spread the remaining 1/3 cup around the sides.

Leave plain OR garnish with strawberry halves. For the decoration below, I sliced strawberries and started at the outside of the cake and layered inwards. It' took a little bit of time but I think it came out nice!

Cake is best when served slightly cool. The butter content in the icing will cause it to soften at room temperature. For best results, store in the fridge! The cake absorbs a lot of the juices from the strawberries -- If serving for a party, it's best to frost a few hours beforehand otherwise the strawberry juices will seep out of the frosting.

DSC03991

DSC03998

Wednesday, June 30, 2010

Building a Nest: Roasted Eggplant Dip

I know people can be stumped at ways to use eggplant... I've used it in eggplant parm, roasted for orzo salad and pizza. I haven't made baba ganoush but I plan to soon as I really enjoy eggplant. This recipe is yet another Ina Garten recipe winner. My family absolutely loves this recipe. It's versatile and easy to prepare. If I have extra, I toss it in with pasta or cook it with chicken. It's really delicious!

Roasted Eggplant Dip
Adapted from Ina Garten

Ingredients


1 medium eggplant
2 red bell peppers, seeded
1 red onion, peeled
2 garlic cloves, minced (I used 3)
3 tablespoons good olive oil
1 1/2 teaspoons kosher salt
1/2 teaspoon freshly ground black pepper
1 tablespoon tomato paste
1 tbsp balsamic vinegar (or more)
1/2 tsp red pepper flakes


Directions

Preheat the oven to 400 degrees F.

Cut the eggplant, bell pepper, and onion into 1-inch cubes. Toss them in a large bowl with the garlic, olive oil, salt, and pepper. Spread them on a baking sheet. Roast for 45 minutes, until the vegetables are lightly browned and soft, tossing once during cooking.

Cool completely (placing hot items in the food processor is not recommended due to BPA chemicals in the food processor bowl).

Place the vegetables in a food processor fitted with a steel blade, add the tomato paste, balsamic vinegar and red pepper flakes, and pulse 3 or 4 times to blend. Taste for salt and pepper.


DSC03990

Monday, June 28, 2010

Building a Nest: Artichoke & Red Pepper Bruschetta

I came across this recipe for artichoke & red pepper bruschetta a few years ago and was pretty impressed by it. Firstly, I love all the ingredients in it... and secondly, it's just plain tasty! I've used the leftover topping and mixed it in with pasta and eaten it with crackers. I've made it for several parties and people seem to enjoy it. I over-toasted the bread this time-- doing too many things at once... oops! If you like artichokes and red peppers and olives, I think you'll like this recipe!

Artichoke & Red Pepper Bruschetta
Sunset Magazine

Yield: Makes 3 dozen appetizers

Ingredients
1 red bell pepper (about 1/2 lb.), rinsed, stemmed, seeded, and finely chopped
1 red onion (about 6 oz.), peeled and finely chopped
1 clove garlic, peeled and minced or pressed
1 tablespoon olive oil
1 can (14 oz.) artichoke hearts, drained and finely chopped
1/4 cup minced parsley
1/4 cup finely chopped pimiento-stuffed Spanish-style green olives
2 teaspoons lemon juice
Salt and pepper
36 diagonally cut slices (1/4 in. thick) sourdough baguette (about 1 slender 8-oz. loaf)
1/2 cup grated asiago or parmesan cheese

Preparation
1. In a 10- to 12-inch nonstick frying pan over medium-high heat, frequently stir bell pepper, onion, and garlic in oil until vegetables begin to brown, 8 to 10 minutes. Add artichokes, parsley, olives, and lemon juice, mixing well. Remove from heat. Season to taste with salt and pepper. If making up to 1 day ahead, cover and chill.

2. Arrange baguette slices in a single layer on a 12- by 15-inch baking sheet. Broil 4 to 6 inches from heat until toasted on 1 side, about 1 minute. Remove from oven and turn slices over.

3. Spoon artichoke mixture equally on untoasted side of baguette slices; spread level. Sprinkle with cheese.

4. Broil 4 to 6 inches from heat until cheese begins to melt and topping is hot, about 1 minute.


 DSC03985

Friday, June 25, 2010

Building a Nest: Grilled Lemon Chicken with Peanut Satay

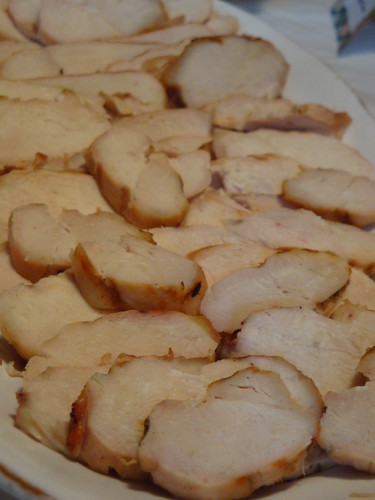
One of my families favorite dishes is Ina's Grilled Lemon Chicken and Peanut Satay. I chose to use it at the baby shower because I could prepare the sauce ahead of time and the chicken has very little prep time. We grilled the chicken a few hours before the party-- it can be served cold and is still delicious. Needless to say, this recipe is a hit. The ladies at the shower loved it and I heard a few of them profess their love to the satay!

I'd definitely recommend this recipe for a nice summer meal, a party or anytime throughout the year. If you haven't tried it before, add it to your menu for this 4th of July!

Grilled Lemon Chicken with Peanut Satay
Ina Garten

3/4 cup freshly squeezed lemon juice (4 lemons)
3/4 cup good olive oil
2 teaspoons kosher salt
1 teaspoon freshly ground black pepper
1 tablespoon minced fresh thyme leaves, or 1/2 teaspoon dried thyme (I forgot this)
2 pounds boneless chicken breasts, halved and skin removed
Satay Dip, recipe follows

Directions

Whisk together the lemon juice, olive oil, salt, pepper, and thyme. Pour over the chicken breasts in a nonreactive bowl. Cover and marinate in the refrigerator for 6 hours or overnight.

Heat a charcoal grill. Grill the chicken breasts for 10 minutes on each side, until just cooked through. Cool slightly and cut diagonally in 1/2-inch-thick slices. Skewer with wooden sticks and serve with Satay Dip. (The chicken breasts I used were really thin so skewering didn't happen).
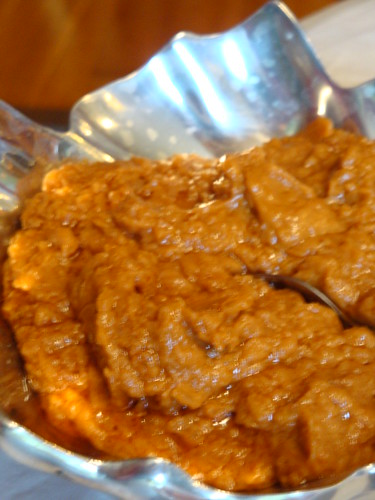
Satay Dip:
1 tablespoon good olive oil
1 tablespoon dark sesame oil
2/3 cup small-diced red onion (1 small onion)
1 1/2 teaspoons minced garlic (2 cloves)
1 1/2 teaspoons minced fresh ginger root
1/4 teaspoon crushed red pepper flakes
2 tablespoons good red wine vinegar
1/4 cup light brown sugar, packed
2 tablespoons soy sauce
1/2 cup smooth peanut butter
1/4 cup ketchup
2 tablespoons dry sherry
1 1/2 teaspoons freshly squeezed lime juice

Cook the olive oil, sesame oil, red onion, garlic, ginger root, and red pepper flakes in a small, heavy-bottomed pot on medium heat until the onion is transparent, 10 to 15 minutes. Whisk in the vinegar, brown sugar, soy sauce, peanut butter, ketchup, sherry, and lime juice; cook for 1 more minute. Cool and use as a dip for Grilled Lemon Chicken skewers.

Yield: 1 1/2 cups


DSC03973

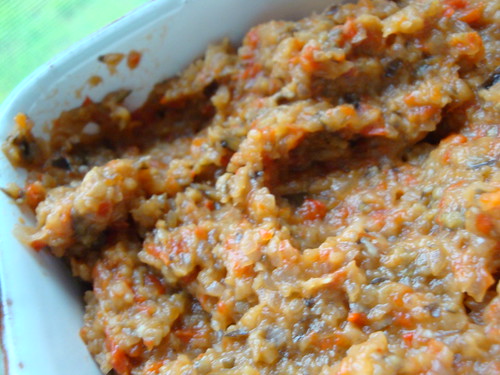
Sorry for the blurry photo!
DSC03971

Wednesday, June 23, 2010

Building a Nest: A Baby Shower Recap

I recently hosted my best friend's baby shower at her home in Vermont. My favorite types of food to prepare for a party are appetizers and desserts. I find it's easier to have everything in individual portions or bite sized as opposed to a sit-down meal or buffet type meal. People can take what they want, when they want and it allows people to eat at their own pace. The party turned out very nicely and we had a good time!

DSC03979


The menu included:
Creamy Cucumber Canapes
Artichoke & Red Pepper Bruschetta
Mushroom Polenta Canapes
Mini Spinach Quiches
Guacamole
Egg  Salad Sandwiches & Tuna Salad Sandwiches
Grilled Lemon Chicken with Peanut Satay sauce
Roasted Eggplant Dip
Fruit Salad
Strawberry Shortcake Cake
Samoa Cupcakes
Cookie Dough Truffles
Sugar Cookie Favors
Punch, Mimosas & Spark Berry Lemonade

I'll be blogging about some of these recipes over the next week! In addition to the meal, we opened presents and decorated onesies. I tried to vary up both these activities a bit. In the invitation, I asked everyone to bring a book instead of a card to help start the new family's library. For our onesie decorating activity, I prewashed all the onesies (4 packages; 1 of each size to 12 months) and provided fabric scraps, fabric markers, puffy pants, and iron-on fabric adhesive. I tried to print up some ideas and stencils but their printer wasn't working right.

What I learned was to try this ahead of time so you understand the process... I didn't have time and secretly hoped someone knew how to do it or the iron-on adhesive had clear instructions-- neither were a correct assumption. In the end, the mama-to-be ended up with some really cute onesies.


DSC04056   DSC04059

DSC04058 DSC04057


I made these last two!
DSC04063  DSC04062


After the shower, the mama-to-be wanted pictures of her pretty flowers she had outside. Isn't she an adorable pregnant woman!?

DSC04045