Friday, July 30, 2010

Barefoot Bloggers: Greek Panzanella

Do you need a quick and easy salad to serve with dinner or bring to a bbq? This recipe was really quick to pull together and received rave reviews. I bet it would even make an incredible bruschetta. The only change I made to the recipe was that I toasted the bread cubes in the oven instead of on the stove... it was just easier for me at the time.

I served this with a grilled greek chicken (need to make again, the grill wasn't cooperating), rice pilaf and an incredible dessert that may be posted on Monday so stay tuned.

Greek Panzanella
Ina Garten

Good olive oil
1 small French bread or boule, cut into 1-inch cubes (6 cups)
Kosher salt
1 hothouse cucumber, unpeeled, seeded, and sliced 1/4-inch thick
1 red bell pepper, large diced
1 yellow bell pepper, large diced
1 pint cherry or grape tomatoes, halved
1/2 red onion, sliced in half rounds
1/2 pound feta cheese, cut in 1/2-inch cubes
1/2 cup calamata olives, pitted
For the vinaigrette:
2 cloves garlic, minced
1 teaspoon dried oregano
1/2 teaspoon Dijon mustard
1/4 cup good red wine vinegar
1 teaspoon salt
1/2 teaspoon freshly ground black pepper
1/2 cup good olive oil

Directions

Heat 3 tablespoons olive oil in a large saute pan. Add the bread cubes and sprinkle with salt; cook over low to medium heat, tossing frequently, for 5 to 10 minutes, until nicely browned. Add more olive oil as needed. I toasted the bread crumbs in the oven... seemed a lot easier to me!

Place the cucumber, red pepper, yellow pepper, tomatoes and red onion in a large bowl.

For the vinaigrette, whisk together the garlic, oregano, mustard, vinegar, 1 teaspoon salt and the pepper in a small bowl. While still whisking, add the olive oil and make an emulsion. Pour the vinaigrette over the vegetables. Add the feta, olives and bread cubes and mix together lightly. Set aside for 30 minutes for the flavors to blend. Serve at room temperature.

DSC04600

Wednesday, July 28, 2010

Summer Shortcake

I've recently discovered a love of shortcakes, whipped cream and berries... I tend to gravitate towards chocolate recipes when making desserts but I do have a strong love for fruit desserts as well... and I was never a fan of whipped cream until recently-- I only eat it paired with the right dessert.

This recipe is easy to make and pull together for a summer bbq or gathering. It's light and tastes delicious... and cute to boot! It was a perfect dessert for the Fourth of July but could make an appearance throughout the summer as well.


Summer Shortcake
adapted from Martha Stewart

Serves 12 to 15

2 1/2 cups all-purpose flour, plus more for dusting
1/4 cup granulated sugar
1 teaspoon baking powder
1 teaspoon baking soda
1 stick (8 tablespoons) cold unsalted butter, cut into 1/2-inch pieces
8 ounces cold cream cheese, cut into 2-inch pieces
3/4 cup buttermilk, plus more for brushing
Raw sugar or fine sanding sugar, for sprinkling
2 pints blueberries
2 pints strawberries, hulled (small berries left whole, large berries halved lengthwise)
3 tablespoons granulated sugar
2 cups (1 pint) heavy cream

Directions

1. Make the biscuits: In a food processor, pulse flour, granulated sugar, baking powder, baking soda, and salt until combined. Add butter, and pulse until largest pieces are the size of peas. Add cream cheese, and pulse again until largest pieces are the size of peas. Add buttermilk, and pulse until dough comes together. Transfer to a bowl, and gently knead into a ball. Cover with plastic wrap, and let rest in the refrigerator at least 1 hour (or overnight).

2. Preheat oven to 450 degrees. Divide dough in half. Working with one portion at a time on a lightly floured work surface, pat into a disk, then roll into a 10-inch round. Transfer to baking sheets lined with parchment paper.

3. Brush biscuits with buttermilk. Generously sprinkle raw or sanding sugar over tops and sides. Brush off sugar from parchment. Bake until dough has risen slightly and is golden brown, 12 to 15 minutes (if bottoms brown too quickly, reduce temperature to 400 degrees). Leave biscuits on sheets. Using a 2 1/2-inch star cutter, cut out (but do not remove) 7 stars from one biscuit while it is still warm. Let cool.

4. Using a paring knife, carefully remove star shapes. Reserve for snacking or another use. (Biscuits can be made up to 8 hours ahead; store on wire racks, and cover loosely with plastic wrap.)

5. Make the filling: Combine blueberries, strawberries, and 2 tablespoons sugar, and let macerate until juicy, 10 minutes.

6. Just before serving, beat cream to medium peaks with remaining tablespoon sugar and the vanilla.

7. Assemble the cake: Place uncut biscuit on a large plate. Spoon half the berries and their juices on top of biscuit, then spread the whipped cream over berries. Top with all but about 1/2 cup berries. (Make sure surface is even; it will support the top biscuit and prevent it from breaking.) Carefully place cutout biscuit on top. Fill star cutouts with reserved berries. Serve immediately, or refrigerate, uncovered, up to 3 hours.


DSC04392

DSC04389

Friday, July 23, 2010

Pecan Crusted Chicken

I've been wanting to make pecan crusted chicken for a while and I don't know what took me so long. I love pecans... I love chicken. It was really easy and really moist! I was surprised how much the chicken absorbed the paprika by soaking in the buttermilk for about 30 minutes. I'd definitely make this again. It was easy and relatively little prep (food processor mostly).

I paired this recipe with baked onion rings and sauteed spinach with garlic.

Pecan Crusted Chicken
adapted from Whole Foods

Ingredients

1 1/2 cups buttermilk
2 teaspoons cayenne pepper
1 1/2 teaspoons salt, divided
1 tablespoon garlic powder
4 (6-8 ounces) boneless, skinless chicken breast cutlets
1 cups corn flakes
2 cups whole wheat bread crumbs
1 cup whole pecans

Directions

Position oven rack to middle shelf; preheat to 375ºF. Spray baking sheet with nonstick spray; set aside.
Whisk together buttermilk, cayenne pepper, 1 teaspoon of salt and garlic powder. Add chicken; marinate 10 minutes.
 
While chicken is marinating, coarsely grind corn flakes and pecans, separately, in a food processor. Mix together in a large bowl; season with remaining salt.
 
Lift a chicken breast out of buttermilk allowing excess to drain off into bowl; cover entire chicken breast in corn-flake mixture; transfer to baking sheet.
 
Repeat with remaining chicken. Throw out any remaining buttermilk.
 
Bake 20 minutes or until internal temperature reaches 170ºF on instant-read thermometer.

DSC04210

Wednesday, July 21, 2010

Baked Onion Rings

I will never eat fried onion rings again. I cannot even believe how much I enjoyed these! So easy! I subbed garlic salt instead of cayenne pepper since I ran out of it while making pecan crusted chicken (look for that post on Friday)... I really don't have much else to say besides how surprised I was that I made onion rings... and they rocked... and you should try this recipe!


Baked Onion Rings
Adapted from Martha Stewart

1 1/2 cups cornflakes
1/2 cup whole wheat dried breadcrumbs
1 large egg
1/2 cup low-fat buttermilk (I used fat-free buttermilk)
1/4 cup all-purpose flour
1/8 teaspoon garlic salt (original recipe: cayenne pepper)
Coarse salt and ground pepper
1 medium sweet onion, such as Vidalia, quartered crosswise and broken into rings (discard small center rings)
2 tablespoons olive oil


Directions

1. Preheat oven to 450 degrees. In a food processor, pulse cornflakes and breadcrumbs until fine crumbs form, then transfer to a medium bowl. In another medium bowl, whisk together egg, buttermilk, flour, and garlic salt and season with salt & pepper (salt omitted since used garlic salt).

2. Dip onion rings in egg mixture (letting excess drip off) and dredge in cornflake mixture; place on a large plate. Pour oil onto a rimmed baking sheet. Place in oven and heat 2 minutes. Remove sheet from oven and tilt to coat evenly with oil. Arrange onion rings on sheet. Bake, turning once, until onion rings are golden brown, about 16 minutes. Season with salt.

DSC04199

Monday, July 19, 2010

Garlic Scape Basil Pesto

I first heard about garlic scapes through the food blog world. I came across them at a farm stand last month and grabbed a bunch to experiment with. I wanted to try to use them in a few dishes but ended up waiting a few days and then I wanted to use them before they went bad... so I ended up making garlic scape basil pesto.

I mixed with gnocci and halved grape tomatoes and the garlic flavor was pretty strong! I was surprised since I thought garlic scapes had a milder flavor of garlic than bulbed garlic-- but this was pretty strong. Regardless, Danimal and I enjoyed it! 


Garlic Scape Basil Pesto

4 garlic scapes (tough ends cut off & chopped into pieces)
1/3-1/2 cup basil
3 tbsp pine nuts
1/4 cup grated parmesan cheese
few swirls of olive oil

Combine all in a food processor and blend to combine.

DSC04177

Friday, July 16, 2010

S'More Whoopie Pies

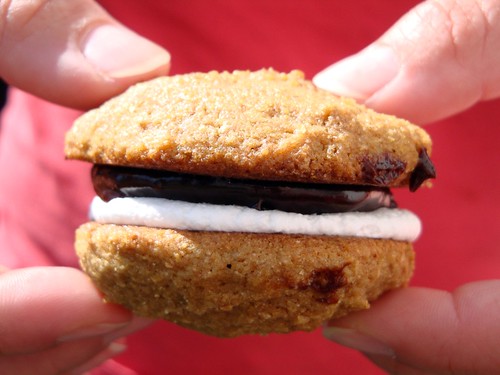
I've had s'mores on my mind for a while now-- it's the perfect combination-- whoever first thought to combine graham crackers, chocolate and marshmallows should be made a saint. I'm a funny girl- I don't love marshmallows... I only eat them in s'mores. I've been thinking about what kinds of desserts can be combined to create a s'more... and a whoopie pie seemed logical. There aren't a lot of recipes out there for it but was happy with the ones I came across. I ended up making these for a work party a few weeks ago and they were a huge hit! I think next time I'll have to double the batch! I now own graham flour so I foresee a lot of s'mores in my future :)


S'More Whoopie Pies
adapted from K Bakes

Graham Cookie
1 1/2 cup graham flour (I used whole wheat graham flour- could use regular whole wheat flour as well)
3/4 cup all purpose flour
1 1/2 tsp baking powder
1/2 tsp salt
4 tbsp unsalted butter, softened
4 tbsp vegetable shortening
1 c packed dark brown sugar
2 large eggs
1/2 cup buttermilk
2 tbsp milk
1 tsp baking soda
1 tsp white vinegar
1 tsp vanilla extract

Directions:

Place rack in the center of the oven and prehead to 375. Line a baking sheet with parchment or silpat mat.

In a medium bowl, stir together both flours, baking powder, and salt.

In a stand mixer fitted with a paddle attachment, beat butter, shortening, and brown sugar until light and cream, about 3 minutes. Add eggs and buttermilk and beat until combined.

In another bowl, combine milk, baking soda, and vinegar. Add this mixture slowly to the batter along with the flour mixture and beat on low speed until completely combined.

Drop about 1 tablespoon of batter onto baking sheet, repeat spacing them at least 2 inches apart- you can use a pastry bag, ziplock bag with tip cut off or a spoon.

Bake for about 10 min until the cakes begin to brown.

Remove from the oven and let the cakes cool on the sheet for 3-5 min before transferring them to a rack to cool completely.

Spread with marshmallow cream and chocolate ganache-- the ganache didn't set in time so I ended up piping/ scooping the ganache onto one side of the cookie and freezing it for 5 minutes. Then placed the other cookie (with the marshmallow cream) on top of it and refrigerated it until ready to serve.

The chocolate softened pretty quickly so I wouldn't recommend letting them sit out-- keep refrigerated until ready to serve.

Makes about 40 two-inch cakes, about 20 assembled whoopie pies.

Marshmallow Cream
1 1/2 c marshmallow creme
1 1/4 c vegetable shortening
1 c confectioner's sugar
1 tbsp vanilla extract

In the work bowl of a stand mixer fitter with the paddle beat together marshmallow fluff and shortening, starting on low and increasing to medium speed until the mixture is smooth and fluffy, about 3 min.

Reduce mixer speed to low, add confectioner's sugar and vanilla, and beat until incorporated. Increase mixture speed to medium and beat until fluffy.

Chocolate Ganache
1 small bag (12oz) semisweet or bittersweet chocolate chips
3/4 cup heavy whipping cream

Place your chocolate in a large, heat proof bowl.

Heat the cream in a saucepan over medium heat just until in bubbles.

Pour the heated cream over the chocolate in the bowl and let it sit for about 10 minutes, until the chocolate is melted. Stir with a whisk until smooth.

Allow the mixture to rest until firm enough to spread, about 2 hours. Or you can refrigerate it for about 30 min until it is firm enough to spread, shirting every 10 min.
 
DSC04270

Wednesday, July 14, 2010

Wilton Cake Decorating Course 3 Recap

I finished the Wilton Cake Decorating Course 3 a few weeks ago! Course 3 is mainly about fondant and gum paste-- which is a neat skill to learn. I'm going to try my hand at homemade fondant in the next couple of weeks and see how that works. I really enjoy frosting with buttercream and royal icing but knowing how to work with fondant is pretty key as well.

I'm excited to use all these new skills! I already have a few cakes I'm planning in the next couple of weeks. Below, I've recapped the four courses. If you haven't taken a cake decorating class yet, definitely try it out! It's a lot of fun!


First Week:
We made a bow and covered the cake in fondant... I think I failed the first attempt at covering... it's pretty pathetic.

DSC03957

DSC03960


Second & Third Week:

Flowers & Borders!

Eyelet Border

DSC04229

Ruffle Border
DSC04225

Inlays & Outlays
DSC04213

DSC04212

Rose
DSC04143

Carnation
DSC04146

Calla Lily
DSC04148

Daisy
DSC04237

Football Mum (not my favorite)
DSC04240


Fourth Class & Final Cake!

DSC04298

DSC04299

DSC04305

And when you slice into it:
DSC04311

DSC04313

Patriotic, huh?

Tuesday, July 13, 2010

Building a Nest: The End

Thank you for sticking with me for all the baby shower posts! One of the projects I was most proud about was the sugar cookie favors. I spaced this project out over the week prior to the shower. I found a few ribbons at AC Moore that had all the colors that I was planning on using.

Sunday evening, I baked the sugar cookies. Monday through Wednesday I decorated them and Thursday I bagged and tied them. I think they came out pretty good-- I added 1/2 tsp corn syrup to my royal icing-- based on the bakeat350.blogspot.com recommendations. It added a bit of gloss to my icing. I'm not a huge fan of corn syrup but I am not sure what else to use to get a bit more shine in the frosting. One batch of frosting was a little shy of frosting 2 batches of sugar cookies... but I made it last though!
Each package got one square cookie and one of the three bird cookies (orange, blue & green).

DSC03946


Here they are, packaged & ready to go!
DSC03951

And that's a wrap!

Friday, July 9, 2010

Building a Nest: Samoa Cookie Flavored Bird Nest Cupcakes

I found the idea for these cupcakes on Martha Stewart's site and they worked perfectly for the theme I was going for for the shower. The hardest part came wtih deciding the cupcake/ frosting combination... i needed to pair with coconut and fit in with bird nest concept-- I searched high and low, and had several ideas... but I wasn't set on any of them. At lunch, the last day of work before the shower, one of my coworkers suggested samoa cookie as a flavor idea... and I literally hopped up and ran to google it. I came across this recipe and it just seemed perfect.

It turned out great! The only problem I had was halving the recipe-- it believe I added the whole amount of cocoa for half the recipe-- but it was pretty good! I'd have to make it again to double check that. The frosting is A.M.A.Z.I.N.G.... it was pretty easy to make and tasted perfect. I'm very happy with how these came out... minus the birds. I think they could have been better... plus I forgot to add their eyes! Ooops!


Samoa Bird Nest Cupcakes
adapted from Life in a Peanut Shell (adapted from Ghirardelli Grand Fudge Cake)

Made 24 regular sized cupcakes (I made half the recipe)

Ingredients:
3/4 cup Unsweetened Cocoa (I tried Ghirardelli cocoa for this recipe)
2 cups all-purpose flour
1 3/4 cups sugar
1 teaspoon baking powder
1 teaspoon baking soda
1/2 teaspoon salt
1 cup butter, softened
1 1/3 cups milk
2 large eggs
2 teaspoons vanilla


Preheat oven to 350ºF. Line 2 regular muffin tins with liners.

In a medium bowl, combine flour, cocoa, baking powder, baking soda, and salt, and set aside.

In a large bowl, cream butter and sugar on medium-high speed until light and fluffy, about 4 minutes. Reduce speed to low, and add vanilla and eggs one at a time, scraping bowl after each addition. Alternately add flour mixture and milk (starting and ending with the flour mixture), while mixing on low speed. Continue to mix until smooth. Scoop into muffin tins.

Bake for about 15-18 minutes.


Caramel Buttercream

2 1/2 cups light brown sugar
1/2 cup butter
1 cup heavy whipping cream, (put 2-3 tbsp aside)
1/2 tsp baking soda
3-4 cups powdered sugar, sifted

In a medium, heavy saucepan, bring the sugar and cream to a rolling boil. Boil one minute.

Add soda, and boil one more minute. Remove from heat.

Add butter, but do not stir yet. Let the mixture cool in the fridge for 1-2 hours. Do not stir until mixture is completely cooled.
Pour mixture into a stand mixer and, using the paddle attachment, beat well. Gradually add powdered sugar alternately with 2-3 tbsp of heavy cream. Beat until desire consistency.


To Decorate:

Toast sweetened coconut until golden in color. Let cool.

Using a 1M tip, frost the cupcakes. Then sprinkle coconut on top of the frosting (most around the perimeter). I used buttercream for the birds-- divide into 2 bowls and color blue & yellow (or whatever color you want). Using a round tip, pipe 3 mounds of blue icing in the middle of the cupcakes. Then use a leaf tip and pipe the beak. Melt some chocolate and use a toothpick and dot the eyes on each bird (use your imagination here).


DSC04002DSC03984

Wednesday, July 7, 2010

Building a Nest: Mushroom Polenta Canapes

A few years ago, I was at a wedding and had a polenta canape during cocktail hour.... and every since I've dreamed of having them again. I had never made polenta before and had only had it a few times. I started envisioning different dishes with polenta in it. For my best friend's shower, I knew I wanted a polenta recipe and searched high and low for the perfect recipe. Somewhere along the recipe search, I decided to pair mushrooms with the polenta and finally came across a Cooking Light recipe.

I thought this recipe came out pretty well- I'd like to make it again when I don't have a lot going on so I can give it a bit more attention (I believe I added cheese to both top and bottom of the polenta pieces... oops!). I thought it had great taste and looked pretty.

My one tip about cooking polenta is to watch out, it spits when you add it to the boiling liquid. Don't stand directly over the pot when it's cooking... or you'll get attacked!


Mushroom Polenta Canapes
adapted from Cooking Light

Polenta:

4 1/2 cups chicken broth
1 1/2 cups quick-cooking polenta
1 teaspoon salt
Cooking spray
1 tablespoon butter, melted
1/2 cup (2 ounces) shredded Gruyère cheese

Topping:
1 cup boiling water
1/2 ounce dried porcini mushrooms
1 tablespoon butter
1/3 cup thinly sliced shallots
1/8 teaspoon crushed red pepper
1 cup sliced shiitake mushroom caps (about 3 1/2 ounces)
1 cup sliced cremini mushrooms (about 3 1/2 ounces)
1 teaspoon dry vermouth or dry white wine
splash of sherry wine
1/2 teaspoon minced fresh thyme
1/4 teaspoon salt
1/4 teaspoon freshly ground black pepper
1/4 cup (1 ounce) shaved Gruyère cheese

Preparation

1. To prepare polenta, bring 4 1/2 cups broth to a boil in a medium saucepan. Gradually add polenta and 1 teaspoon salt, stirring constantly with a whisk. Reduce heat to low; cook 3 minutes or until thick, stirring frequently. Spoon polenta into a 13 x 9–inch baking pan coated with cooking spray, spreading evenly. Press plastic wrap onto surface of polenta; chill 1 hour or until firm.

2. Preheat broiler.

3. Invert polenta onto a baking sheet coated with cooking spray. Cut polenta into 36 rectangles (leave polenta on baking sheet). Broil 5 minutes. Turn polenta over. Brush polenta with 1 tablespoon butter. Broil 5 minutes. Sprinkle 1/2 cup shredded cheese evenly over rectangles; broil 5 minutes or until cheese melts.

4. To prepare topping, combine 1 cup boiling water and porcini mushrooms in a bowl; cover and let stand for 15 minutes. Drain; chop mushrooms.

5. Melt 1 tablespoon butter in a large nonstick skillet over medium heat. Add shallots to pan; cook 4 minutes or until tender, stirring frequently. Stir in red pepper; cook 30 seconds. Add porcini, shiitake, and cremini mushrooms; cook over medium-high heat 10 minutes or until liquid evaporates, stirring occasionally. Stir in vermouth, sherry, thyme, 1/4 teaspoon salt, and black pepper; cook 2 minutes, stirring frequently.

6. Spoon 1 teaspoon mushroom mixture on top of each polenta rectangle; top rectangles evenly with shaved cheese.


DSC03995

Friday, July 2, 2010

Building a Nest: Strawberry Shortcake Cake

I am skipping to the dessert section of the baby shower-- I think I still have one or two more posts on the appetizers left-- but I wanted to post this recipe before the Fourth of July weekend. I first made this recipe last year for my in-laws 40th wedding anniversary and we all absolutely loved it. I don't believe I had ever had cream cheese frosting prior to that and now I'm hooked. This recipe is absolutely perfect-- I did add some lemon zest to the cake and never measure the powdered sugar that goes into the frosting-- I just judge by taste and texture... and so far, it's worked out pretty well!

If you have a few strawberries laying around the house, I encourage you to try this recipe. It's absolutely devine!

Strawberry Shortcake Cake
adapted from Pioneer Woman

Cake

1-½ cup Flour
3 Tablespoons Corn Starch
½ teaspoons Salt
1 teaspoon Baking Soda
9 Tablespoons Unsalted Butter, Softened
1-½ cup Sugar
3 whole Large Eggs
½ cups Sour Cream, Room Temperature
1 teaspoon Vanilla
2 tsp fresh lemon zest

Icing
½ pounds Cream Cheese, Room Temperature (I use 1/3 less fat cream cheese)
2 sticks Unsalted Butter
1-½ pound Powdered Sugar, Sifted
1 teaspoon Vanilla

1 pound Strawberries
Cake pan at least 2 inches deep-- I used 9 x 2 round pan.

Preparation Instructions

Sift together flour, salt, baking soda, and corn starch.

Cream 9 tablespoons butter with the sugar until light and fluffy. Add eggs one at a time, mixing well each time. Add sour cream and vanilla and mix until combined. Add sifted dry ingredients and mix on low speed until just barely combined.

Pour into greased and floured 9-inch cake pan. Bake at 350 degrees for 45 to 50 minutes, or until no longer jiggly. Remove from cake pan as soon as you pull it out of the oven, and place on a cooling rack and allow it to cool completely.

Stem strawberries and slice them. Place into a bowl and sprinkle with 3 tablespoons sugar. Stir together and let sit for 30 minutes. After 30 minutes, mash the strawberries in two batches. Sprinkle each half with 1 tablespoons sugar and allow to sit for another 30 minutes. The original recipe states to mash the strawberries but I skip that step- I keep them in tact.

Frosting
Combine cream cheese, 2 sticks butter, sifted powdered sugar, vanilla, and dash of salt in a mixing bowl. Mix until very light and fluffy.

Slice cake in half through the middle. Spread strawberries evenly over each half (cut side up), pouring on all the juices. Place cake halves into the freezer for five minutes- this makes icing the cakes easier.

Remove from freezer. Use a little less than 1/3 of the icing to spread over the top of the strawberries on the bottom layer. Place the second layer on top. Add half of the remaining icing to the top spreading evenly, then spread the remaining 1/3 cup around the sides.

Leave plain OR garnish with strawberry halves. For the decoration below, I sliced strawberries and started at the outside of the cake and layered inwards. It' took a little bit of time but I think it came out nice!

Cake is best when served slightly cool. The butter content in the icing will cause it to soften at room temperature. For best results, store in the fridge! The cake absorbs a lot of the juices from the strawberries -- If serving for a party, it's best to frost a few hours beforehand otherwise the strawberry juices will seep out of the frosting.

DSC03991

DSC03998