Friday, March 1, 2013

Sweet Potato Waffles

It's no secret that I love breakfast food... I also have a child who is a carboholic. Thankfully, she sometimes cooperates with me when I feed her and therefore I try to pack in as much nutrition as possible. These waffles are pretty easy to make-- I try to keep some cooked sweet potatoes in the freezer for things like this. I made a batch of waffles and froze them for quick breakfasts too! 


Sweet Potato Waffles
Adapted from Mayo Clinic

1/3 cup cooked sweet potato, or 1/4 cup canned pumpkin puree
1/2 cup all-purpose (plain) flour
1/2 cup whole-wheat (whole-meal) flour
1/4 cup cornmeal, preferably stone-ground
1 tablespoon baking powder
1/2 teaspoon salt
1/8 teaspoon ground cinnamon
1/8 teaspoon ground ginger
1 cup plain almond milk (soy milk/ coconut milk etc)
2 tablespoons maple syrup or light brown sugar
2 tablespoons olive oil
1 egg white
* chia seeds/ flaxseed meal/ wheat germ as desired *


Directions

In a small bowl, sift together the flours, cornmeal, baking powder, salt, cinnamon and ginger (and any additives like chia seeds/ flaxseed meal/ wheat germ. In a large bowl, whisk together the milk, sweet potato puree, olive oil and 2 tablespoons maple syrup (brown sugar). Add the flour mixture and stir just until combined.
Using an electric mixer on high speed, beat the egg white until stiff peaks form. Make sure that the mixing bowl and beaters are spotlessly clean and free of fat. Even a small amount of fat, such as egg yolk or oil, can prevent the egg whites from whipping properly. Once whipped, gently whisk 1/3 of the egg white into the batter to lighten it. Using a rubber spatula, gently fold the remaining egg white into the batter, mixing just until incorporated.
Preheat a waffle iron. Spoon or ladle about 1/2 cup batter into the waffle iron, depending on the size of the iron. Spread evenly and cook according to the manufacturer's instructions. If the batter thickens, thin with a little soy milk. Repeat with the remaining batter to make 6 waffles. Serve topped with the syrup. 


Monday, February 25, 2013

Banana Oatmeal Pancakes

Yes, I lied. I never really did get back to posting here. I have found a few recipes that I wanted to document so that I don't lose them and I can share them with people. My 17 month old daughter is dairy and soy free so it's been a little bit of a challenge to plan meals and find foods that she can eat.

My dear friend introduced me to this recipe and gets all the credit. She's done most of the playing around with it and was the one to rave about them. I just adapted it to work for our family being dairy/ soy free. This is a great recipe to get some veggies into your toddler and it's pretty quick to mix up! They are also easy to freeze and throw in a to-go container for on-the-go snacks! I have not made them egg-free but I'm pretty sure that they can be made by substituting the egg with flaxseed meal + water. 


Banana Oatmeal Pancakes
Adapted from Mayo Clinic

1/2 cup old-fashioned rolled oats
1 cup water
2 tablespoons firmly packed light brown sugar
2 tablespoons canola oil
1 cup flour (I use white whole wheat but works well with all purpose as well)
1 1/2 teaspoons baking powder
1/4 teaspoon baking soda
1/4 teaspoon salt
1/4 teaspoon ground cinnamon
3/4 almond milk (or any milk alternative) OR 1/2 cup 1 percent low-fat milk + 1/4 cup fat-free plain yogurt
1 banana, peeled and mashed 
1 egg, lightly beaten

* optional: ground flaxseed meal, wheat germ, shredded vegetables* (carrots, zucchini, broccoli), dried cranberries, chia seeds, mashed sweet potato, chocolate chips
In a large microwave-safe bowl, combine the oats and water. Microwave on high until the oats are creamy and tender, about 3 minutes. Stir in the brown sugar and canola oil. Set aside to cool slightly.
In a bowl, combine the flour, baking powder, baking soda, salt and ground cinnamon. Whisk to blend.
Add the milk/ yogurt and banana to the oats and stir until well blended. Beat in the egg. Add the flour mixture to the oat mixture and stir just until moistened.  Mix in an of the optional ingredients at this time. I add in about 1/2- 3/4 cup of shredded vegetables usually.  *works best if you squeeze excess water out of shredded vegetables.
Place a nonstick frying pan or griddle over medium heat. When a drop of water sizzles as it hits the pan, spoon 1/4 cup pancake batter into the pan. Cook until the top surface of the pancake is covered with bubbles and the edges are lightly browned, about 2 minutes. Turn and cook until the bottom is well browned and the pancake is cooked through, 1 to 2 minutes longer. Repeat with the remaining pancake batter.

update: I now cook them in a stainless steel pan coated with coconut oil and they cook up perfectly. I do find that the density of the batter can make them difficult to cook all the way thru, especially when shredded vegetables are added. I would add more milk if you find they aren't cooking through. 
This is a regular banana oatmeal pancake:

 And this is one with zucchini, broccoli, carrot, chia seeds, flaxseed meal and wheat germ:


Friday, February 17, 2012

A revival post: Lemon Almond Cake


Sooooooooooooooooooo... apparently, I let my blog die out... Is there anyone out there? Give me a shout if you can hear me!

I think it's been over a year from my last blog post... in that year, I've been busy!

We added to our crazy zoo in September!

Our beautiful baby girl is almost 5 months old now. It's been a truly amazing ride so far! We are over our heads in love.
 

I haven't been in the kitchen as much in the past year but about this time last year, I had come across a recipe I wanted to make for one of my coworkers for her birthday. She loves lemon and almond flavored things and is always suggesting I add one of the two flavors to baked goods. I ended up getting a nasty cold around her birthday so I ended up just buying a cake. I shelved this recipe for the year but dug it out this week. I have to say, I myself, am a chocoholic... I tend to be selective with what I eat in terms of cakes and don't indulge unless it's chocolate. BUT I would have devoured this cake myself if given the chance. It came out moist and a perfect balance of flavors.


Meyer Lemon Almond Cake
recipe from The Merry Gourmet

Ingredients for Cake

1 1/3 cup sugar
8 ounces almond paste
3/4 cup plus 1/4 cup all purpose flour
1 cup (2 sticks, 8 ounces) unsalted butter, cubed and at room temperature
1 1/2 teaspoons baking powder
3/4 teaspoon kosher salt
1 teaspoon vanilla extract
1/2 teaspoon almond extract
1/2 teaspoon lemon extract
7 drops orange flower water (optional)  (I omitted this)
Zest of 2 Meyer lemons
6 large eggs, room temperature


Ingredients for Meyer Lemon Glaze
1 cup confectioners sugar
2 to 3 tablespoons Meyer lemon juice


Directions:

Preheat oven to 325 degrees F. Butter a 9-inch diameter spring form pan, dust with flour, and tap out any excess. Line the bottom of the pan with a round of parchment paper.

In a small bowl, whisk together 3/4 cup flour, baking powder, and salt. Set aside.

In a food processor, pulse the sugar, almond paste, and 1/4 cup flour until the almond paste is finely ground and the mixture resembles sand. Add the cubes of butter, the extracts, the orange flower water, and the Meyer lemon zest. Process until the batter is smooth and fluffy. Add the eggs, one at a time, processing a bit before the next addition, scraping down bowl as needed.

Transfer the batter to a large mixing bowl and add the flour mixture. Mix by hand until the dry ingredients are just incorporated. Do not overmix. Pour batter into prepared spring form pan and bake for 65 minutes, or until the top is deep brown and feels set when you press in the center.

Remove cake from oven and run a sharp serrated knife around the perimeter, loosening the cake from the sides of the pan. Let the cake cool completely in pan; once cool, remove sides of spring form pan and invert cake onto rack. Remove bottom of spring form pan and parchment paper from the cake. Carefully turn cake back over and onto a cake plate for serving.
While cake is cooling, make Meyer lemon glaze: In small bowl, mix confectioners sugar with lemon juice, adding more lemon juice if necessary to achieve the desired consistency (less juice for a thicker glaze; more juice for a thinner glaze). Once cake is cool and on cake plate for serving, drizzle glaze over cake. Serve and enjoy!


Monday, January 10, 2011

Best Chocolate Cake Recipe ever...

This summer, I was on the search for an amazing chocolate cake recipe. I had made the Hershey chocolate cake recipe several times and while I enjoyed it, I didn't love it. I came across this cake recipe and immediately drooled. The original recipe's buttercream frosting is a bit off on the measurements so I adjusted it and added in some cream cheese to give it a rich flavor.

This cake was divine. I've made it again since and it gets rave reviews. I think this chocolate cake is my go-to recipe from now on.

Chocolate Cake with Vanilla Buttercream Frosting & Chocolate Ganache Glaze
Adapted from Sarah Campbell/ $40 a Day

3 cups packed brown sugar
3/4 cup canola oil
3 eggs
2 2/3 cups flour
2 1/4 teaspoons baking powder
2 1/4 teaspoons baking soda
1 1/2 teaspoons salt
1 tablespoon vanilla extract
1 1/2 cups milk
1 1/2 cups water
1 1/8 cups cocoa powder

Frosting:
1 1/2 sticks sweet butter, softened
4 oz cream cheese, softened
3 cups sifted powdered sugar
2 tablespoons vanilla extract
1 pinch salt

Ganache:
1 1/4 cups semisweet chocolate chips
3/4 tablespoon light corn syrup
3/4 cup heavy cream

Directions

To make the cake: Preheat the oven to 350 degrees F. Oil 3 (10-inch) cake pans and line the bottom with parchment paper. Alternately, oil the pans and then flour them. (I use Wilton's Bake Easy spray instead.) Also, I used three 9 inch pans and made cupcakes with the extra batter.

In the bowl of an electric mixer, combine the brown sugar and oil. Turn on the mixer to a low speed and mix in the eggs. Let the sugar, oil, and eggs mix while sifting together the flour, baking powder, soda, and salt in a separate bowl. Set this mixture aside.

In another small bowl, mix the vanilla into the milk and set this aside as well. Bring the water to a boil and pour over the cocoa and whisk it until it is smooth. To the egg mixture, alternately add the flour mixture and the milk mixture beginning and ending with flour. With the mixer off, scrape down the sides of the bowl after each addition. With the mixture at a low speed add the cocoa. Scrape down the sides of the bowl and pour this mixture into the prepared cake pans. Bake the cake for approximately 15 minutes or until tester comes out clean. When cake layers have cooled, remove from pans.

To make the frosting: In an electric mixing bowl place the soft butter and cream cheese and beat it on a low speed while adding powdered sugar. When all the sugar is mixed in, turn off the mixer and scrape down the sides of the bowl. Add in the vanilla and salt and let the mixer beat for 5 to 7 minutes on a medium speed. Fill and frost the cake and refrigerate it for 10 to 20 minutes to set up the frosting.

To make the ganache: In a heatproof bowl, place the chocolate chips and the corn syrup. Bring the heavy cream to a full boil. Pour the cream over the chocolate and whisk it until smooth then set it aside.Pour ganache over the top of the cake and, with a cake spatula, smooth the top of the cake and allow ganache to spill over the sides. Refrigerate for 20 minutes or longer.

Serve the cake cold or allow it to come to room temperature before serving.  If you so chose, chocolate covered strawberries look great on the cake and taste pretty good as well. Enjoy!


DSC04845

DSC04861

Wednesday, November 17, 2010

Fresh Berry Tiramisu

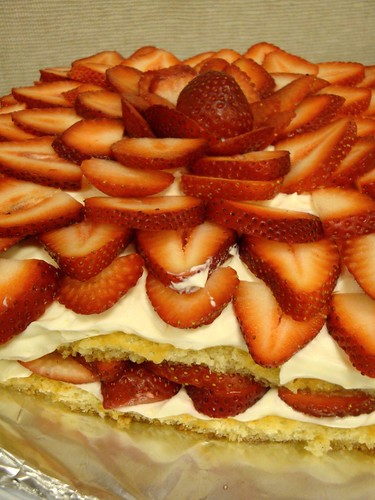
A few months ago, one of my coworker's announced that she married her long-time boyfriend in a private wedding ceremony. We were very excited for her and wanted to host a small celebration in her honor. I started searching for the perfect recipe to help her celebrate his new beginning and came across a berry tiramisu. I don't think I've ever had tiramisu-- it's not really my thing and halfway through this experiment, I came to the realization it’s really hard to make a recipe that you don’t know what the end product is going to taste like (probably obvious, but I guess I like to state the obvious).

The biggest obstacle for me was creating the sponge cake portion. I had a hard time incorporating the flour mixture into the egg mixture. The flour gobbed up (best description I can think of) and created pockets of flour surrounded by the wet-egg mixture. I was trying to be careful not to deflate the batter by mixing too hard so after a while I ended up baking the cake. The flour chunks softened when I added the syrup after it baked but I realized I need to learn how to fold flour into a wet mixture better. It was stressful!

Anyway, after that adventure, I assembled the cake and I have to say, this recipe is pretty incredible. My coworkers absolutely loved it! I am dreaming of strawberry season so I can make it again.


Fresh Berry Tiramisu
Adapted from King Arthur Flour

Sponge cake

1 cup unbleached all-purpose flour
1 teaspoon baking powder
1/2 teaspoons salt
6 large eggs
1 cup sugar
1/2 teaspoon almond extract

Syrup
Zest of 2 lemons, peeled in strips with a peeler
Juice of 2 lemons (1/3 to 1/2 cup lemon juice)
2 whole cloves
3/4 cup sugar
3/4 cup water
3 tablespoons Grand Marnier or orange juice

Filling
1 pound mascarpone cheese
2 tablespoons orange zest
1 cup (8 ounces) whipping cream
1/2 cup confectioners’ sugar

2 quarts berries: raspberries, blueberries, strawberries or any combination you like
Preheat the oven to 350°F and lightly grease, or line with parchment, a 13 x 18-inch half-sheet pan or two 9-inch square pans (this would lead to a thicker cake).

To make the cake:
Whisk together the flour, baking powder and salt, set aside.

Combine the eggs, sugar and almond extract in a large mixing bowl. Beat with an electric mixer at high speed until thick and lemon-colored, about 5 minutes.

Sprinkle one third of the dry ingredients over the egg mixture, and fold them in with a whisk, taking care not to deflate the batter. Repeat twice more with the remaining dry ingredients, then pour the batter into the prepared pan(s). If you’re using two 9-inch square pans, divide the batter evenly between them.

Bake the cake in the preheated oven for 20 minutes, or until the top springs back when lightly touched with a finger.

Remove the cake from the oven and run a knife around the edge of the pan while still warm (as the cake baked, it pulled away from the edges of the pan, so I didn't need to do this). Place the cake on a rack to cool completely before taking it out of the pan.

To make the syrup:
Combine all the syrup ingredients and bring the mixture to a simmer, stirring occasionally until the sugar dissolves. Once the mixture is clear, remove the syrup from the heat, strain it, and allow it to cool to room temperature.

To make the filling:
Place the mascarpone in a mixing bowl, and wisk in the orange zest. Add the whipping cream a third at a time, stirring between additions until the mixture is smooth. Stir in the confectioner’s sugar. Beat for at least a minute or more as needed until the filling is light and fluffy.

To assemble:
Flip the cooled cake out of its baking pan or pans onto a piece of parchment paper. If you’ve baked on parchment, peel the parchment off the back. Pull the paper straight back, keeping it parallel to the surface of the cake; this will discourage any bits of cake from coming off with the paper.

Slice the cake in half down the middle, to make two roughly 9 by 13-inch rectangles. Trim the rectangles to make 9-inch squares, and set aside the excess to use for another purpose (trifle perhaps?). If you’ve used two 9-inch square pans, flip the cooled cakes out of their pans and peel the parchment off the bottoms.

Place one of the 9-inch squares in the bottom of a lightly greased 9-inch square pan (or a cake stand, plate, etc- basically, you can't really move the sponge cake after you soak it so make sure this is your final destination). Using a pastry brush, generously soak the cake with 1/2 cup of citrus syrup. You’ll need to dab the syrup on, let it soak in for a few minutes, then repeat the process.

After the cake has been soaked, spread half the mascarpone filling over the cake. Next, arrange a single layer of berries over the filling then place the second square of cake on top. Soak this layer of cake with syrup as you did before. Spread the remaining filling over the cake layer, then place the rest of the berries in an attractive design on the top (I started at the perimeter with sliced berries and moved towards the center). Refrigerate the cake for at least an hour before serving.

Yield: one 9-inch cake, 16 2-inch squares.

DSC05046

Monday, November 15, 2010

Yummy Chocolate Buttercream Frosting

And I'm back! I really disappeared... I don't know where I went... nor do I know where time has gone. The summer and fall flew by! I baked up a storm this summer and then have cut back this fall... I have a lot of recipes to share that are backlogged from the summer so I apologize if it's not seasonally appropriate since some of the produce is now out of season. Bear with me, I think I found a few great recipes though!

The majority of the summer was focused around my grandmother since we were hosting 90th birthday celebration for her. It was such an honor to celebrate this milestone with our family and friends. We had family that flew in from CA, AZ, FL, NY/ NJ and CO to help celebrate our grandmother's special day.

I took the week off from work to spend with our family... and bake and bake and bake. I made a double layer 9x13 birthday cake & 3 dozen cupcakes as well as about 8 dozen cookies for the evening. It was definitely an adventure to make all of the desserts but it was a great learning experience as well. I put my little kitchenaid stand mixer to work. For the cake & cupcakes, I use the marble cake recipe I've used before but tried a new chocolate frosting recipe. I also made about 100 royal icing pansy flowers to decorate the cake. I really liked this frosting-- I think I should have added a bit more milk to some of the batches as it was pretty dry but it came together nicely and worked pretty well for decorating.

I learned a few things in the process:
  • I needed to double each cake layer recipe but couldn't really double it in my mixer, so I had to make 4 batches separately. That is really hard to do with a marble cake mix!
  • The frosting was delicious but I had to make each batch separately as well... which slowed the decorating a lot because I had to stop and make a new batch when I ran out (I think I made 4 batches of frosting).
  • I think I made the layers too thick because slicing the cake was nearly impossible. It was stacked a bit too high and fell over. I think I needed to use 1 1/2 batches of the cake recipe vs 2 batches.
Chocolate Frosting
adapted from Williams Sonoma

Ingredients:
8 oz. unsweetened chocolate, chopped
6 cups confectioners' sugar
16 Tbs. (2 sticks) unsalted butter
6 Tbs. milk, plus more, if needed
2 tsp. vanilla extract
1/4 tsp. salt

Directions:
All ingredients should be at room temperature.

Melt chocolate in a double boiler (I use a pyrex bowl over a pot of simmering water) or microwave the chocolate. Stir until the chocolate is melted and smooth. Let cool to room temperature.

In the bowl of an electric mixer fitted with the flat beater, combine the confectioners' sugar, butter, the 6 Tbs. milk, the vanilla and salt and beat on low speed until combined, about 1 minute. Stop the mixer and scrape down the sides of the bowl. Increase the speed to medium and beat for 2 minutes, then reduce the speed to low. Add the chocolate and beat until combined, then increase the speed to medium and beat for 1 minute more.

If the frosting is dry, add more milk, 1 tsp. at a time, until it is creamy but still holds peaks. Makes about 4 1/2 cups.

DSC04680
 
DSC04670
 
DSC04678

Monday, August 30, 2010

Blueberry Buckle

Hey long lost friends! I've been really lazy this summer and haven't sat down to write. I hope you all have had fantastic summers! I've been doing a lot of baking so keep your eyes out for a lot of posts in the next few weeks. 

This recipe I'm sharing with you today is one of my family's summer hits. We have friends who have taken this recipe and added it to their restaurant menu. I have great memories of waking up to the smell of blueberry buckle as it's being pulled out of the oven. At our lake house, our neighborhood gathers and has breakfast on the beach at least once a summer and the blueberry buckle is a constant there. 

You won't be disappointed in this recipe! It's just delicious. 

Blueberry Buckle

3/4 cup sugar 
1/4 cup butter, at room temperature
1 egg 
1/2 cup milk
2 cup flour 
2 tsp baking powder
1 1/2 tsp grated lemon peel 
1/2 tsp salt 
1 1/2 cup blueberries

Crumb topping:
1/2 cup sugar 
1/3 cup flour
1/2 tsp cinnamon 
1/4 cup butter, softened

Preheat oven to 375°.  Grease & flour (or spray) 8” pan. 

In a small bowl, combine flour, baking powder & salt. 

In a large bowl (or stand mixer), cream the butter & sugar together until light and fluffy. Then add egg and mix, stopping to scrape the sides of the bowl. Next, mix in the lemon peel & milk. Slowly add the flour mixture until incorporated, then fold in blueberries (if using frozen blueberries, toss them with a bit of flour to cover). 

Spread in pan. Combine topping ingredients and sprinkle over batter. Bake for 25-35 minutes (depending on how much you want it cooked-- my family likes it pretty gooey). 

For 8x8 pan- double the topping recipe.  
For 9 x 13 pan-  double batter recipe & triple the topping. 


DSC04482