Friday, April 30, 2010

Hardest Part of The Meal is Boiling Water

How do you feel about cooking outside of the comforts of your own kitchen? With different (or lack of certain kitchen utensils)? When we were in Georgia in March, the house my in-laws rented had minimal kitchen gadgets and supplies. My mother-in-law picked up a stockpot from the dollar store and they had a few gadgets and utensils...but I hate feeling lost outside of my own kitchen. It takes so much longer to cook in someone else's kitchen. If I plan on cooking at someone else's house, I usually bring everything I need with me.... since we were flying, we obviously couldn't bring anything!

When my sister-in-law and I were preparing dinner, we had everything timed out perfectly... until we realized the water wasn't boiling. It took us 45 minutes to bring the water to a boil. It was absolutely the most ridiculous thing ever- I've never seen anything like it. Once, we got that going we were golden. This dish is pretty easy to put together and very tasty! I'd definitely recommend it.


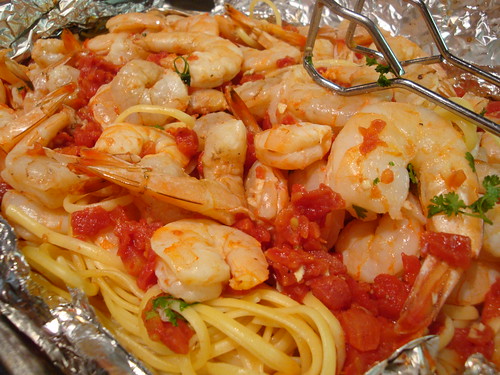
Shrimp Pasta in Foil Package
Pioneer Woman

Ingredients

½ cups Olive Oil
4 cloves Garlic, Minced
3 whole 14.5 Ounce Cans Diced (or Whole) Tomatoes
½ cups White Wine
2 pounds Jumbo Or Large Shrimp, Peeled And Deveined
Salt And Pepper (to Taste)
Fresh Parsley, Minced
1 pound Linguine, Uncooked
Red Pepper Flakes (to Taste)


Preparation Instructions
Cook pasta for 1/2 the recommended cooking time. Pasta should still be very firm.

In a large skillet or pot, heat olive oil over medium heat. Add garlic and saute for a minute. Dump in the tomatoes and wine. Stir the mixture together, season with salt and pepper, and allow to cook for ten minutes.

Meanwhile, prepare a large parcel of heavy duty aluminum foil. It should be large enough to hold the entire pasta dish.

Throw the shrimp on the top of the pasta sauce. Throw the drained pasta over the top, then pour the whole dish onto the foil. Tightly wrap the foil into a parcel.

Bake at 350 degrees for 15 minutes. Remove from oven and keep warm until serving.

Open the foil parcel right before serving. Drizzle a tiny bit of olive oil over the top. Squeeze on lemon juice, if desired.


DSC02972

Wednesday, April 28, 2010

Avocado and Crab Salad

Back in March, Danimal and I traveled with his sister and her husband to Georgia. My in-laws spent the month renting a cute house on a fabulous island on the coast of Georgia. We had a fabulous couple of days exploring the area and walking the beach. My sister-in-law and I made dinner for everyone one night and wanted to use some of the local products. We had hoped to make it to the fish market but it turned out to be closed. The local supermarket turned out to be our only option... so we weren't able to use the locally caught fish.... but still had a fabulous dinner!

This recipe is so simple and easy... and soooooooooooo good! I can't wait to make it again. Crab and avocado really compliment each other and together, they make a perfect appetizer.

Here are two of my favorite pictures from our trip:

DSC03030

DSC03037


Avocado & Crab Salad
Gina's WW Recipe

1 medium Hass avocado
4 oz lumb crab meat
2 tbsp chopped red onion
1 lime, juiced
1 tbsp chopped cilantro
1 tsp olive oil
salt and pepper

In a medium bowl, combine onion, lime juice, olive oil, cilantro salt and pepper. Add crab meat and toss well.

Cut avocado open, remove pit and spoon out avocado. Cut into large chunks and add to crab. Mix carefully, not to mash the avocado. Spoon back into avocado shells and enjoy!

Serves 2
DSC02967

Monday, April 26, 2010

A Tribute

Is there a food or recipe that every time you make, it triggers memories of a particular person? One particular meal triggers some of the happiest memories for me and yet, it's one of the simplest meals to prepare.

I had the privilege of spending every summer of my life surrounded by some of the most special people in my life. My community of neighbors at our house on a beautiful lake in Maine are like family. Their friends and family, by extension are an extension of my family.

Every summer, our neighbors hosted a couple. This couple would in return host an annual breakfast for the kids in the neighborhood. We looked forward with anticipation to Aunt Evelyn's and Uncle Sam's visits. Uncle Sam would make us Black-Eyed Susan's for breakfast (otherwise known as eggs-in-a-basket). Uncle Sam carried on this tradition following his wife's passing until he was no longer able to make his annual trip to the lake. He was a kind and generous man who was full of love and shared it with the community.

Yesterday was Danimal's birthday and he requested eggs and bacon for breakfast, specifically, Black-Eyed Susan. As I was preparing them, I thought back to my summers with Uncle Sam-- and remembered his warmth and love. I thought about how much we loved our special breakfasts with him as I ate my own egg-in-a-basket.

This afternoon, I received an email letting me know that Uncle Sam passed away peacefully last night. I could not get over the fact that I spent most of the day thinking about him yesterday. I am so blessed that I had the opportunity to know him, learn from him and be a part of his world. I am also so thankful that my husband requested that particular style of eggs yesterday.

We will miss you Uncle Sam. I will make sure this tradition is carried on to the next generation.


DSC03369

Black-Eyed Susan's
1 slice of bread
1 egg

Use a glass to cut a hole out of the middle of the bread. Place bread in preheated, greased frying pan. Crack egg and drop in to the hole in the bread. Flip the bread after a minute or two, depending on desired consistency. Cook other side for a minute or so. Fry the cutout piece of bread along with the egg/bread combination and use it to mop up the yolk.

Enjoy!

Friday, April 23, 2010

Wilton Roses

Well the roses class was an adventure. I made the cake on Wednesday night after I made dinner (which took a lot longer than I expected). I couldn't find the shortening so I couldn't make the frosting nor frost the cake ahead of time. I ran home from work Thursday afternoon and whipped up the frosting and did the crumb coat and final layer... there are still a ton of crumbs sneaking through and I really need to practice. I also realized on the way home that my cake carrier was broken (and I left it at work) so I ran into KMart and grabbed one.

Turns out the cake carrier was too small and didn't fit the cake.... so I placed the cake gently in my car and drove to class. Just as I was pulling in to Michaels, the sky opened up and it started pouring rain! I had to make a dash from the car to the store without getting too much rain in the frosting. I ended up purchasing a new cake carrier (and a few new icing colors) and having a great class. Because of the humidity, the frosting softened up really quickly and was rather tough to work with but I think I got the hang of the roses and can't wait to practice!

I can't wait for course 2 in May!

DSC03333

DSC03331

DSC03334

Wednesday, April 21, 2010

Cake Decorating Course 1 recap

This week is Danimal's first full week home since January. I haven't occupied my kitchen much in the last few months so I'm running low on posting material. I'm hoping to have more to post in the next few weeks and I'll be posting more often again.

During the month of March, my friend and I took the Wilton Cake Decorating Course 1 at Michaels. It was graet to learn some of the basics. I didn't love the projects they had us do but it was really fun anyway.

I am making up the roses class this week so I'll post pictures from that but in the meantime, here are pictures from class 2 (clowns) and class 4 (rainbow). We're taking course 2 in May. Starting in June, Wilton is reorganizing their courses so I'm intrigued to see what the changes are.

For the first cake, I used Smitten Kitchen's yellow cake recipe and filled it with a raspberry puree of sorts. It tasted great but was not great pared with the Wilton buttercream frosting we have to use. I am not a fan of the frosting recipe because it's just too sweet for me and can't wait to play around with different recipes. For class 4's cake, I ended up using a box mix. Since I really don't like the frosting, I didn't really want to waste my time or good ingredients. I filled it with a peanut butter concoction. Interesting choice-- I wasn't a fan but some of my coworkers enjoyed it.

Course 1; Class 2
Creepy clowns, huh?! They are weird!  
 DSC02947

 DSC02945

Course 1; Class 4
DSC03087

DSC03091

Friday, April 16, 2010

More Muffins!

Shocking, another muffin post. I don't have much to say besides the fact that I love these muffins. They are delicous and have a *little* too much chocolate... not my opinion, beacuse I can never have enough chocolate! So far, I've made these muffins about a dozen times and they are really easy to prepare and turn out great!

Golden Chocolate Chip Muffins
King Arthur

1/2 cup (4 ounces) butter
1 cup (7 ounces) granulated sugar
2 teaspoons baking powder
1/2 teaspoon salt
1 teaspoon vanilla extract
1 tablespoon cinnamon
2 large eggs
1/2 cup (4 ounces) milk
2 cups (8 1/2 ounces) White Whole Wheat Flour
2 cups (12 ounces) chocolate chips
coarse sparkling sugar, for topping

Preheat the oven to 350°F. Lightly grease (or line with muffin cups, and grease the muffin cups) a standard-size muffin pan.

Beat together the butter, sugar, baking powder, salt, vanilla, and cinnamon until fluffy. Beat in the eggs, then stir in the milk. Mix in the flour, then the chocolate chips.

Spoon the batter into the muffin cups; they’ll be quite full. Sprinkle each muffin with a little coarse sugar. Bake the muffins for 30 minutes, or until a cake tester inserted into the center of one comes out without crumbs clinging to it (a little chocolate is OK!). Remove from the oven, and carefully tilt in their cups. This allows the heat to escape, preventing the muffins from becoming soggy

Yield: 12 muffins.


DSC02880

Wednesday, April 14, 2010

Kugel for Passover

During Passover, I was craving dessert and decided I needed kugel. I googled a few recipes and grabbed some ingredients on my way home from work. I have a serious problem of not reading the recipe all the way through before starting. I peeled the apples, soaked the matzoh and then grabbed the carton of eggs from the fridge. My jaw dropped on the floor when I saw it had 8 eggs. Anyway, I played with this recipe a bit and I was pretty happy with the end result. It tasted pretty similar to the noodle kugel my family makes-- no where as creamy though.

Anyway, I enjoyed it and it was a nice change from the kugel that I know and love. I'll have to blog about that one sometime soon!

Apple-Matzoh Kugel
adapted from Epicurious: Abigail Kirsch

4 large apples, Granny Smith or any tart apple, cored and cut into medium diced
1/2 cup light brown sugar
1/4 cup orange juice
6 plain matzohs (I used egg matzohs)
8 eggs (5 egg whites, 3 whole eggs)
1 teaspoon salt
1 teaspoon ground cinnamon
1 1/2 cups sugar 1/2 cup sugar (I cut the sugar down significantly)
1/2 cup (8 tablespoons) butter or margarine, melted 6 tbsp butter, melted (probably could use less or eliminate)
1 cup golden raisins
1 cup dried apricots, medium, chopped
4 tablespoons butter or margarine, cut into small pieces, for casserole topping (I used less)
cinnamon & sugar mixture
chopped nuts (walnuts possibly)- I didn't add any but I definitely think it would be a great addition


1. Preheat the oven to 350°F.

2. Toss the apples with the brown sugar and orange juice, set aside in a medium bowl.

3. Break the matzoh into 2- to 3-inch pieces and soak in 1 cup of warm water until soft but not mushy. Set aside.

4. While the matzoh soaks, beat the eggs with a wire whisk in a large bowl until blended. Add the salt, sugar, cinnamon and melted butter.

5. Squeeze the liquid from the softened matzoh and add the matzoh to the egg mixture with the apples. Stir the kugel well and pour into a lightly greased 2 1/2-quart casserole dish or a 10x14-inch pan (I used a 9x13 pan). Sprinkle cinnamon & sugar mixture evenly on top of the mixture. Dot the top of the kugel with the 4 tablespoons of butter.

6. Bake the kugel for 1 hour. Cover the top with foil if the top begins to become too brown early in the baking. Remove the kugel from the oven and cool to room temperature.

DSC03117

Friday, April 9, 2010

Quinoa & Passover

I've cooked with quinoa (pronouced keen-wah) once before and I didn't have great success. Firstly, you have to rinse it (unless it is pre-rinsed) and that was an epic fail for me... more ended up in drain than anywhere else and it wasn't substantial enough for the dish. I had been hearing the buzz that quinoa was a great find during Passover and was really excited to try a new dish for our seder (or non-seder, as we just gathered together the night before- no actual seder took place but there was matzoh ball soup!).

A friend pointed out a recipe for quinoa salad-- and I can't turn down anything with asparagus! This recipe turned out pretty well. I think most of my family enjoyed it and it was a nice, light dish with great flavor. I used a bit more asparagus than the recipe called for. I wasn't a huge fan of the oranges, probably because I'm really picky about oranges... what other fruit do you think you could substitute for oranges? I'd love to hear what you think.


Quinoa Salad with Asparagus, Dates & Oranges
Cooking Light

Salad:
1 teaspoon olive oil
1/2 cup finely chopped white onion
1 cup uncooked quinoa
2 cups water chicken broth (low-sodium)
1/2 teaspoon kosher salt (if you use chicken broth, you may want to skip this)
1 cup fresh orange sections (about 1 large orange)
1/4 cup chopped pecans, toasted (or more if you want!)
2 tablespoons minced red onion
5 dates, pitted and chopped
1/2 pound (2-inch) slices asparagus, steamed and chilled (I used a few extra stalks)
1/2 jalapeño pepper, diced

Dressing:
2 tablespoons fresh lemon juice
1 tablespoon extravirgin olive oil
1/4 teaspoon kosher salt
1/4 teaspoon freshly ground black pepper
1 garlic clove, minced
2 tablespoons chopped fresh mint
Mint sprigs (optional)

Preparation
1. To prepare salad, heat 1 teaspoon oil in a large nonstick skillet over medium-high heat. Add white onion to pan; sauté 2 minutes. Add quinoa to pan; sauté 5 minutes. Add 2 cups chicken broth and 1/2 teaspoon salt to pan; bring to a boil. Cover, reduce heat, and simmer 15 minutes. Remove from heat; let stand 15 minutes or until water is absorbed. Transfer quinoa mixture to a large bowl. Add orange and next 5 ingredients (through jalapeño); toss gently to combine.

2. To prepare dressing, combine juice and next 4 ingredients (through garlic) in a small bowl, stirring with a whisk. Pour dressing over salad; toss gently to coat. Sprinkle with chopped mint. Garnish with mint sprigs, if desired. Serve at room temperature.


DSC03096

Wednesday, April 7, 2010

Oats, Peanut Butter and Chocolate, Oh My!

Oatmeal. Check. Peanut Butter. Check. Chocolate Chunks. Check. This cookie has it all! I love oatmeal chocolate chip cookies and I don't think I would have ever thought to add peanut butter to them... but wow, this makes it extra special! These cookies are a bit crispy... I may have baked them too long though.

Also notice, one batch makes 60 cookies! Yes, 60. It's pretty awesome. I left half the batch with our pet sitter when we were on vacation a few weeks ago. The other half, I split between my carryon and my sister-in-law's so we could snack on the plane and drive to our destination.

Definitely try these! I don't think you'll be disappointed!

Chunky Peanut Butter and Oatmeal Chocolate Chipsters
Baking, From My Home to Yours by Dorie Greenspan

3 cups old-fashioned rolled oats
1 cup all-purpose flour
1 teaspoon baking soda
2 teaspoons cinnamon
1/4 teaspoon nutmeg
1/4 teaspoon salt
1 cup unsalted butter, at room temperature
1 cup chunky peanut butter (I used creamy)
1 cup sugar
1 cup packed light brown sugar
2 large eggs
1 teaspoon vanilla extract
9 ounces bittersweet chocolate, chopped into chunks, or 1 1/2 cups chocolate chips or chunks
Adjust the racks to divide the oven into thirds and preheat to 350°F. Line 2 baking sheets with parchment paper, Silpat baking mats, or foil. In a large bowl, stir together the oats, flour, spices, baking soda, and salt just to blend.

With an electric mixer (preferably a stand mixer fitted with a paddle), beat the butter, peanut butter, brown sugar, and sugar on medium speed until smooth and creamy. Add the eggs, one at a time, and beat in the vanilla. Reduce the mixer speed to low and add the dry ingredients slowly, beating only until blended. Stir in the chocolate chips. (At this point, the dough can be covered and refrigerated for up to 1 day.)

If the dough is at room temperature, drop rounded tablespoonsful two inches apart onto the prepared baking sheets. If the dough has been refrigerated, scoop it out by rounded teaspoonfuls and roll the balls between your palms. Place them 2″ apart on the sheets. Press the balls gently with the heal of your hand until they are about 1/2″ thick. Bake for 13-15 minutes, until the cookies are golden and just firm around the edges.

Lift the cookies onto wire racks with a wide metal spatula – they will firm as they cool. Repeat until all the dough has been used.


DSC02954