Wednesday, February 24, 2010

There's an oreo at the bottom!

 I've tried making cheesecake once in my life and it was probably my biggest kitchen disaster. I pride myself on being able to at least choose successful and yummy recipes but the one I tried was absolutely disgusting. I think I should have taken a clue since I found it in a Renal Transplant newsletter. It ended up in the trash.

Danimal and I went skiing a few weekends ago with a bunch of work people and friends. I didn't want to go empty handed so I made a bunch of desserts... these oreo cheesecake cupcakes and the coconut cupcakes. This recipe is great because it's easy to pull together and can be cut in half. I highly suggest trying this recipe! I used light cream cheese and sour cream and can only imagine how rich and creamy it is with regular cream cheese. They are pretty amazing!

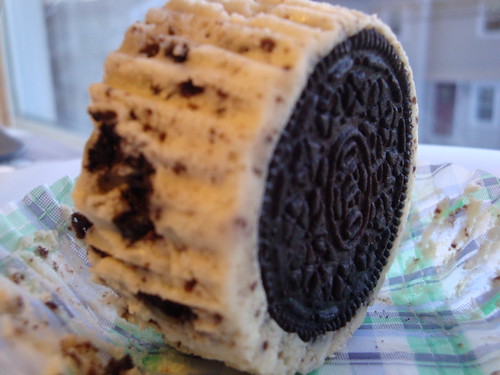
Oreo Cheesecake Cupcakes
as seen on Cate's World Kitchen which was adapted from 52 Cupcakes, originally from Martha Stewart’s Cupcakes

22 Oreos, 16 left whole, and 6 coarsely chopped
2 8-oz packages cream cheese, at room temperature (or Neufchatel) (I used Philly LIGHT cream cheese)
1/2 cup sugar
1/2 tsp vanilla extract
2 large eggs, room temperature, lightly beaten
1/2 cup sour cream (I used light sour cream)
Pinch of salt

Preheat oven to 275 F.

Line 12 standard muffin tins and 4 ramekins with paper liners.

Place 1 whole Oreo in the bottom of each lined cup.

Beat the cream cheese in the bowl of a stand mixer on medium. Gradually beat in the sugar and vanilla. Pour in the beaten eggs, a little at a time, scraping down the sides of the bowl after each addition. Beat in the sour cream and salt. Stir in chopped cookies by hand.

Pour the batter into the prepared tins, filling each almost to the top.

Bake, rotating pan halfway through, until filling is set, 22-25 minutes.

Cool in the pans for about 15 minutes, on a wire rack, then transfer to a plate in the refrigerator for at least 4 hours.

dsc02818

dsc02825

Monday, February 22, 2010

Cookie Dough Heaven

I've seen cookie dough truffles featured in blogs and on websites many a time before. A few months ago, my sister made them and I heard how incredible they were. I had already made oreo truffles and cake balls and found dipping them in chocolate to be time consuming and a pain. I wasn't really sure if I wanted to take that on again.

Well, people kept blogging about them and I kept thinking about them and I knew I needed to try it myself. What can be better than cookie dough and chocolate?! I have a bunch of bags of chocolate candy coating but I don't really like the taste of them. I decide to try it with chocolate chips and they worked pretty well- I did that to save time. Next time I'm using real chocolate. Adding the oil helps thin the chocolate and works to coat the truffles. The dough is less sticky than oreo truffles and cake balls and dipping them took less time!

These are pretty yummy and I am totally making them again!


Cookie Dough Truffles
Paula Dean

1/2 cup butter, softened
3/4 cup firmly packed brown sugar
1 teaspoon vanilla extract
2 cups all-purpose flour
1 (14-ounce) can sweetened condensed milk
1/2 cup semisweet mini chocolate morsels
1 cup finely chopped pecans
1 1/2 pounds chocolate bark candy coating, melted
1 1/2 cups semi-sweet chocolate chips (or another good chocolate, chopped)- melted
2 teaspons canola oil


In a large bowl cream butter and brown sugar with an electric mixer at medium speed until creamy. Add vanilla. Gradually beat in flour and add milk. Add chocolate morsels and pecans, mixing well. Shape into 1-inch balls. Place on waxed paper; chill 2 hours.

Melt chocolate in a double boiler (I used the base of a double boiler and a pyrex bowl- boil water and reduce to a simmer. Place bowl on the pot and add chocolate. Be careful not to let water touch the chocolate. Add oil to thin the chocolate and mix to combine). Using 2 forks, dip cookie balls into chocolate to cover. Place on waxed paper and chill to set. Store in the refrigerator for at least 1 hour.


dsc02817

Friday, February 19, 2010

"Healthy" Muffins

I know, another muffin post! I go a little crazy at times. I like muffins, what can I say. I make these when I want to feel "healthy". They are pretty easy to mix up and easy for breakfast on the go.

Oatmeal Yogurt Applesauce Berry Muffins
adapted from Joy the Baker
Makes 12 muffins

1 1/4 cups whole wheat flour
1 1/4 cups oats
1 tsp baking powder
1/2 tsp baking soda
1/4 tsp salt
1 tsp cinnamon
1 cup unsweetened natural applesauce (I use Musselmans)
1/2 cup non-fat plain yogurt (I use Stonyfield)
1/2 cup firmly packed brown sugar
2 tbsp canola oil
1 large egg, lightly beaten
3/4 cup mixed berries (or blueberries)- frozen; fresh, if available!
3/4 cup semi-sweet chocolate chips (optional)

Preheat oven to 375 degrees.

Line a 12 cup muffin tin with paper cases or spray with nonstick cooking spray (I don't suggest baking without liners, it is hard to remove from the muffin tin).

In a large bowl combine flour, oats, baking powder, baking soda, salt and cinnamon. In a medium bowl combine applesauce, yogurt, sugar, oil and egg. Make a well in dry ingredients and add applesauce mixture.

Stir until just moist. If using frozen berries, toss them in about 1tbsp flour to coat. Fold in berries and chips.

Fill muffin tins 2/3 full and bake for 16-18 minutes (sometimes mine take a little longer than). 
 
dsc02719

Monday, February 15, 2010

Cuteness in cookie form

Get ready for cuteness... these things are absolutely adorable. These puppies are mini chocolate chip whoopie pies and were less than two inches in diameter. They are pretty easy to make and are a hit. They seem easy enough to make with a group of kids. I don't love regular whoopie pies- I find them too sweet but these had the perfect amount of chocolate for me! Enjoy :)


Mini Chocolate Chip Whoopie Pies
Nestle Tollhouse

Cookies:
  • 1 1/4 cups all-purpose flour
  • 1/4 teaspoon baking soda
  • 1/4 teaspoon salt
  • 1/4 cup (1/2 stick) butter, softened
  • 1/4 cup packed brown sugar
  • 1/2 cup milk
  • 1 large egg
  • 1/2 teaspoon vanilla extract
  • 1/2 cup Semi-Sweet Chocolate Mini Morsels

Preheat oven to 350°F. Line two baking sheets with parchment paper or lightly grease.

Combine flour, baking soda and salt in small bowl. Beat butter and sugar in medium mixer bowl on medium speed until light and fluffy. Beat in milk, egg and vanilla extract (mixture will be thin.) Beat in flour mixture on low speed until smooth. Stir in morsels. Drop by heaping measuring teaspoonfuls onto prepared baking sheets. (A total of 36 cookies are needed for the recipe.)

 Bake for 12 to 14 minutes until springy to the touch. Cool completely on baking sheets.


Filling
  • 1 cup (6 oz.) Semi-Sweet Chocolate Mini Morsels
  • 1 cup marshmallow crème (Fluff)
  • 2 tablespoons butter, softened  
Microwave morsels in uncovered, medium microwave-safe mixer bowl on HIGH (100%) power for 30 seconds; stir. The morsels may retain some of their original shape. If necessary, microwave at additional 10- to 15-second intervals, stirring just until morsels are melted.

Add marshmallow crème and butter to melted chocolate. Beat on medium speed until smooth. Transfer filling to resealable plastic bag. Cut hole from corner of bag. Squeeze heaping tablespoon of filling onto flat side of one cookie, top with flat side of second cookie to make a sandwich. Repeat with remaining cookies and filling. Store in covered container in refrigerator.

dsc02747

Thursday, February 11, 2010

Barefoot Bloggers: Coconut Cupcakes

Through the food blogging world, I stumbled upon a group of bloggers who create and blog about Ina Garten's recipes called Barefoot Bloggers. Ina's recipes rarely fail me so I was excited to join this group. People choose recipes and post twice a month. This month, Jaime from Jamie’s Green Kitchen chose Coconut Cupcakes.

I'm not a coconut fan myself but Danimal is... he was really excited to see the bag of shredded coconut in my shopping bag. I wasn't really sure how to change this recipe as I don't like coconut. The only change I made was I made half the amount of frosting as the reviews said that the full amount was too much. The frosting seemed a bit more runny than I expected-- I think I added too much sugar. I don't have a scale at home so I guestimated and I think I really overshot the amount. Oh well!

I haven't had any guinea pigs yet as Danimal is still traveling. We're leaving on a ski trip tonight so they'll be traveling with us. I'll report back later on and let you know how they taste! The recipe says it makes 18-20, I ended up with 24 large cupcakes... I'd make them smaller next time and have even more!

Coconut Cupcakes
Ina Garten

3/4 pound (3 sticks) unsalted butter, room temperature
2 cups sugar
5 extra-large eggs at room temperature
1 1/2 teaspoons pure vanilla extract
1 1/2 teaspoons pure almond extract
3 cups flour
1 teaspoon baking powder
1/2 teaspoon baking soda
1/2 teaspoon kosher salt
1 cup buttermilk
14 ounces sweetened, shredded coconut - divided

For the frosting: (This is the full amount, I made half of this)
1 pound cream cheese at room temperature
3/4 pound (3 sticks) unsalted butter, room temperature
1 teaspoon pure vanilla extract
1/2 teaspoon pure almond extract
1 1/2 pounds confectioners' sugar, sifted

Directions
Preheat the oven to 325 degrees F.
In the bowl of an electric mixer fitted with the paddle attachment, cream the butter and sugar on high speed until light and fluffy, about 5 minutes. With the mixer on low speed, add the eggs, 1 at a time, scraping down the bowl after each addition. Add the vanilla and almond extracts and mix well.

In a separate bowl, sift together the flour, baking powder, baking soda, and salt. In 3 parts, alternately add the dry ingredients and the buttermilk to the batter, beginning and ending with the dry. Mix until just combined. Fold in 7 ounces of coconut.

Line a muffin pan with paper liners. Fill each liner to the top with batter. Bake for 25 to 35 minutes, until the tops are brown and a toothpick comes out clean. Allow to cool in the pan for 15 minutes. Remove to a baking rack and cool completely.

Meanwhile, make the frosting. In the bowl of an electric mixer fitted with the paddle attachment, on low speed, cream together the cream cheese, butter, and vanilla and almond extracts. Add the confectioners' sugar and mix until smooth.

Frost the cupcakes and sprinkle with the remaining coconut.


dsc02804


dsc02803

Monday, February 8, 2010

A Bit of Spice

I've been adopted! I'm participating in "Adopt a Blogger #4" where an experienced blogger adoptes a newbie (aka ME!) for a few months and knowledge, mentoring and friendships form. I'm so thrilled to be adopted by Jessica from My Baking Heart. Her blog is fabulous and I can't wait to see what happens over the next few months. Check her out!

I learned a lesson with this meal... organization is helpful! A few weeks ago, I mapped out our meals for the week and made a shopping list. The day I decided to make General Tsao's Chicken, I looked up the recipe before I left work to make sure I had everything I needed... in the middle of making this dish, I couldn't figure out where some of the ingredients fit in. Turns out, I have several versions of this recipe saved (Martha Stewart & Weight Watchers)... the recipe turned out really well but next time, I need to make note of which recipe I am using (or at least that there may be different versions) so that I don't have wasted ingredients.

The dish was a bit too spicy for me but Danimal really enjoyed it.

General Tsao's Chicken
adapted from Weight Watchers

3/4 cup(s) canned chicken broth, reduced-sodium
1 1/2 Tbsp cornstarch
2 Tbsp brown sugar
2 Tbsp low-sodium soy sauce
1 Tbsp white wine vinegar
1/2 tsp ground ginger
2 tsp peanut oil
2 medium scallion(s), chopped
2 medium garlic clove(s), minced
1/2 tsp red pepper flakes, or 1 dried chili pepper, minced
1 pound(s) uncooked boneless, skinless chicken breast, cut into 2-inch pieces
2 cups brown rice, cooked


Directions
In a medium bowl, whisk together broth, cornstarch, sugar, soy sauce, vinegar and ginger; set aside.
Heat oil in a wok or large skillet over medium-high heat. Add scallions, garlic and pepper and cook 2 minutes. Add chicken and cook until browned all over, about 5 minutes.

Add reserved sauce and simmer until sauce thickens and chicken is cooked through, about 3 minutes.

Serve chicken and sauce over rice. Yields about 1 cup of chicken and sauce and 1/2 cup of rice per serving.


dsc02691

Friday, February 5, 2010

Go Red for Women

Today is National Wear Red Day to support the fight against heart disease in women. I walked in to our morning staff meeting and found myself facing a sea of ladies in red. It was quite an amazing sight! If you'd like more information about heart disease and "Go Red for Women" visit www.goredforwomen.org/.

Since it's February, the middle of winter, in New England, good fruit is usually scarce. I was at the market the other day and I found the fruit aisle to be well stocked with berries... mostly strawberries... and the price was great! I tend to just cut strawberries up and eat them plain, or sprinkled with a bit of sugar, for dessert but I wanted to try something new. I found a Weight Watchers recipe that just seemed perfect for a cold, February day.

Balsamic Strawberries
Weight Watchers

4 cups strawberries, halved or quartered
2 tbsp unpacked brown sugar
1 tbsp balsamic vinegar
1/8 tsp black pepper, freshly ground
1/2 cup  fat-free vanilla yogurt (I use Stonyfield FF French Vanilla)
1 tbsp mint leaves, optional

1. Combine strawberries, sugar, vinegar and pepper in a bowl. Marinate in the refrigerator for at least 1 hour, stirring at least once.
2. Serve in 4 small glasses or bowls and top each with  2 tablespoons of yogurt and garnish with mint.

1 point per serving


dsc02700

Wednesday, February 3, 2010

Blooming Herb Bread

I think I keep saying this but as soon as I saw this recipe, I wanted to make it. Seriously though, it looks so pretty (at least when Paster Ryan made it on Pioneer Woman's blog) and it's pretty easy. Next time I will plan a little bit ahead of time so I can let it rise to it's full potential! Danimal could not stop grabbing pieces off of it while the rest of our meal was cooking. I think it's a keeper in our zoo!


Blooming Herb Bread
Pioneer Woman/ Paster Ryan

Ingredients
20 ounces, weight Bread Flour (all Purpose Is Okay, Too) - About 4 Cups
8 ounces, fluid Water
4 ounces, fluid Melted Butter
Chopped Herbs Of Choice (I used fresh Rosemary & chopped garlic)
2 teaspoons Salt
1 teaspoon Active Or Instant Yeast (if Active, It Would Be Best To Sprinkle Yeast Over The Water To Let It Start To Work Before Mixing It In)


Preparation Instructions

Combine all ingredients together in the KitchenAid stand mixer with the dough hook. If you don't have a stand mixer, you can combine ingredients and knead by hand. It's easier in the mixer though!

Mix for about 10 minutes or so until you can successfully achieve a windowpane with the dough (when you can pull off a small chunk of the dough you’re kneading and stretch it gently to see if it is somewhat translucent. If you can do this without it tearing, it’s ready).

Preheat oven to 450 degrees.

After the dough starts rising, it should be kneaded for a minute or two so that the yeast can redistribute. Form it into a dome and place in a covered cast iron pan after coating it with olive oil and a sprinkling of kosher salt. Cut a large ‘X’ into the surface of the bread dough so it can bloom!

Bake on the center rack of your over for 30 minutes with the lid on, them remove the lid to finish it off for another 15 to 30 minutes.


After I placed the dough in the bowl, I squirted some fresh lemon juice on top of it... It gave it a little kick. I also didn't let the dough rise as much as I should have.... but we were hungry!

dsc02681

Monday, February 1, 2010

A Roasted Dinner; Topped with a Chicken

This is my go-to chicken recipe for company. It's really easy and has never failed me. It's even easier now when I can buy a whole container of already-peeled garlic! The chicken comes out so juicy and the skin is crispy and golden. Try it out sometime I think you'll be very happy! The last several times I've made it, I've paired it with parmesan roasted broccoli and a potato dish (either roasted garlic potatoes, or mustard roasted potatoes).


Everyday Garlic Chicken
Great Good Foods by Julee Rosso

1 whole chicken, about 3 pounds (I used a 7lb chicken roaster)
1 whole lemon, pricked several times
24 garlic cloves, peeled
2 teaspoons ground ginger
3 cups chicken broth (I use low-sodium chicken broth)
Freshly ground pepper

1. Preheat the oven to 400 degrees.

2. Wash the chicken and pat it dry inside and out. Place the lemon in the cavity and place the chicken in a small roasting pan (I use my 9x13 pyrex dish). Cut one clove of garlic in half and rub into the breast skin. Then, rub in the ground ginger.

3. Place the chicken in the oven and bake for 20 minutes; add 1 1/2 cups of broth and bake for another 20 minutes. Reduce the heat to 375; add the remaining broth and garlic, and cook for 30 to 40 minutes (increase cooking time as needed based on weight of roaster), basting every 10 minutes. Remove the chicken from the pan and place it on a platter, breast side down, to rest for 10 to 15 minutes.

4. Pour the collected juices into a fat-skimming cup and defat. With a fork, mash the garlic. Place the garlic and defatted juices back in the roasting pan. Over medium-high heat, reduce the liquid by half, stirring frequently. Strain if you desire a smoother sauce. Carve the chicken and pass the sauce at the table.

Serves 4.

Nutrition information based on original recipe:
Cal. 289   Carb. 12g   Protein 38g   Chol 109mg   Fat 9g

Sorry... horrible pictures... isn't it nice and golden though?!
dsc02639

And a funny view of the bird.
dsc02638